Have you ever been in a model’s cam room and were amazed by their professional looking on-screen display? Maybe they had a visible watermark or a second webcam in the picture? That model was likely streaming with an external encoder, such as OBS Studio.
OBS Studio is free to download and with a little learning you can use it to visually elevate your shows to a whole new level, too!
OBS: Free Software With No.B.S.
OBS Studio is an open source software program designed for video streaming and recording. It also functions as an external encoder, which helps give your live shows a higher quality. This type of software is a must have for serious streamers of all kinds because it gives you technical and creative control over your content.
OBS is configured to work with various well-known streaming services like Twitch, but it also supports a few popular cam sites. Currently, OBS can be used to cam on BongaCams, Chaturbate and Cam4. If you work on one of those sites, read ahead. If not, you can still use these principles for recording videos, so stick around!
Broadcasting without a watermark isn’t a cam crime, but it’s in your best interest to add one whenever possible. This tells the world that, depending on the platform you are broadcasting from, this awesome cam show is owned by you – or by the network. Though piracy takedowns require DMCA processing via the content’s owner or a registered agent, having your name emblazoned on your show can’t hurt in the interim… because watermarking also tells new viewers who you are if they’ve never seen you before. This reinforces your brand and increases the chance of you profiting off of your content if it’s being seen by large audiences.
Creating your watermark with OBS Studio is easy and works best when it’s simple and doesn’t detract from your show. Your watermark needs information that identifies you, like your cam username or personal website. For cam shows, stick with your stage name or username. For custom clips, add your personal website or social media handle if allowed.
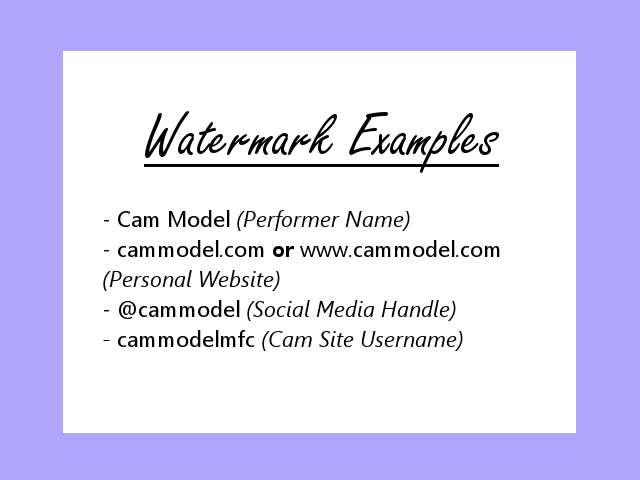
Your goal is to direct viewers back to you so that they can purchase more content, but be aware that some sites restrict what kind of personal accounts you can mention or promote. Here are some examples of the of information you could put in your watermark:
Step-by-Step Watermarking
The following is a step-by-step guide to watermarking with OBS.
FYI, for software support, troubleshooting and community based resources, visit obsproject.com/help. And if you find this article helpful or want to exchange OBS Studio tips, hit us up on Twitter!
Step1: Download & Auto-Configure
Download OBS Studio right here. Select the version that’s compatible with your computer’s operating system.
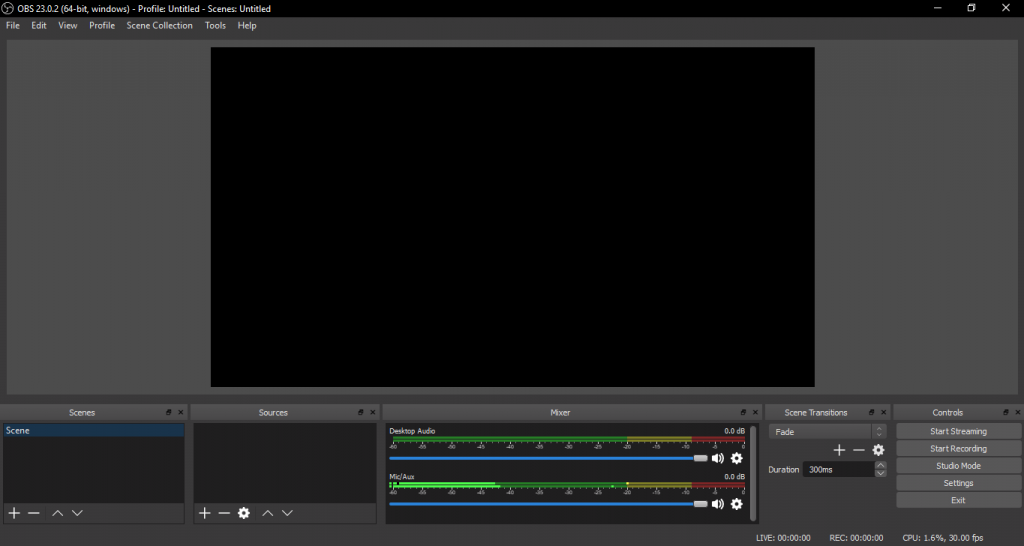
The first time you open the program you’ll be prompted to run the Auto-Configuration Wizard. If you don’t get a prompt, select it from the “Tools” drop down menu at the top of the screen. For now, you can leave all the settings as they are during the setup. If you want to learn how to use OBS but won’t be linking a cam site, skip the auto-configuration setup and scroll down to the next section.
Images of OBS.
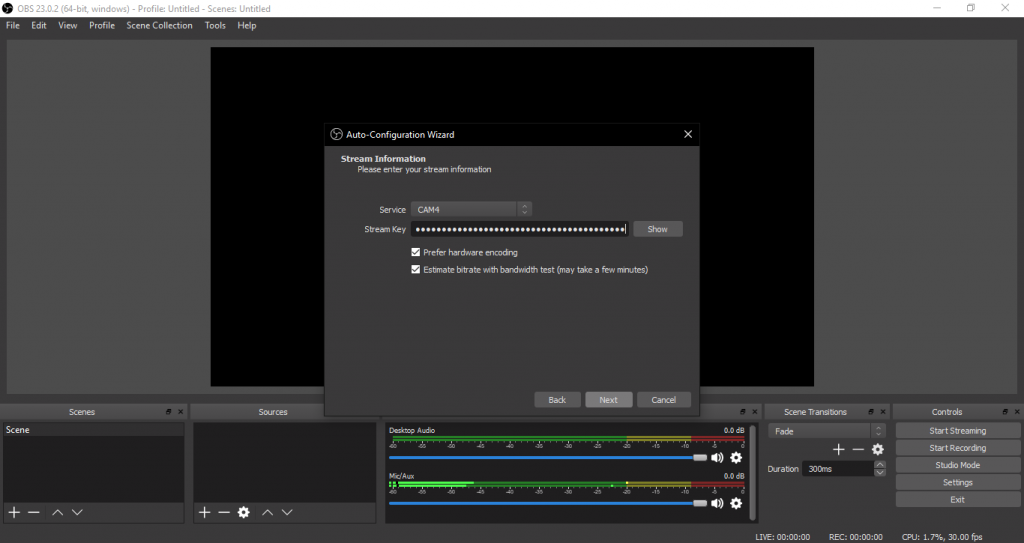
During the setup, when you see the window that says “Stream Information,” you’ll be able to configure your cam room with the software. If you work on one of the supported cam sites, go to your cam site profile to get your stream key and enter it into the text box.
Caution: Don’t share your stream key with anyone because it’s like a technical password unique to your cam room.
For the auto-configuration wizard to complete it needs to do a short test by broadcasting a few moments of video test components without audio to your cam room. Before you start the test, set a password on your cam room so that no one sees the test. Once that is done, you can start working on your watermark.
Step 2: It’s Okay To Make A Scene!
Now that the software is ready, the first thing to do each time OBS is opened is to name the Scene Collection. From the top of the screen, select “Scene Collection” and then “Rename” from the drop down menu. I named the scene collection “How To Watermark With OBS Studio.” Think of the Scene Collection as the name for the entire project.
Next name the Scene by clicking in the box in the bottom left corner of OBS where it says “Scene.” Right click “Scene” and rename it. I named this “Watermark on Live Cam Show.”
Think of the Scene as the chapter of the entire project (Scene Collection) that you are working on. You can have unlimited scenes in OBS Studio, so name them every time for clarity.
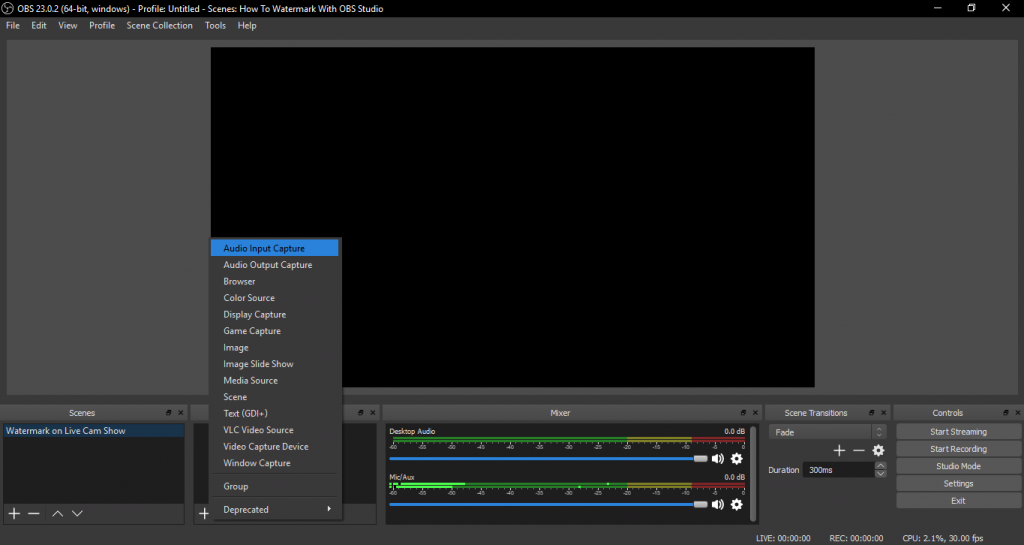
After you’ve named everything the next step is to add audio and video sources. This will be your webcam and microphone. OBS Studio automatically detects the audio from your computer and built-in microphone, but you will need to add an audio source each time you create a new scene.
Screen Source Audio 1
Screen Source Audio 2
Screen Source Audio 3
Screen Source Audio 4
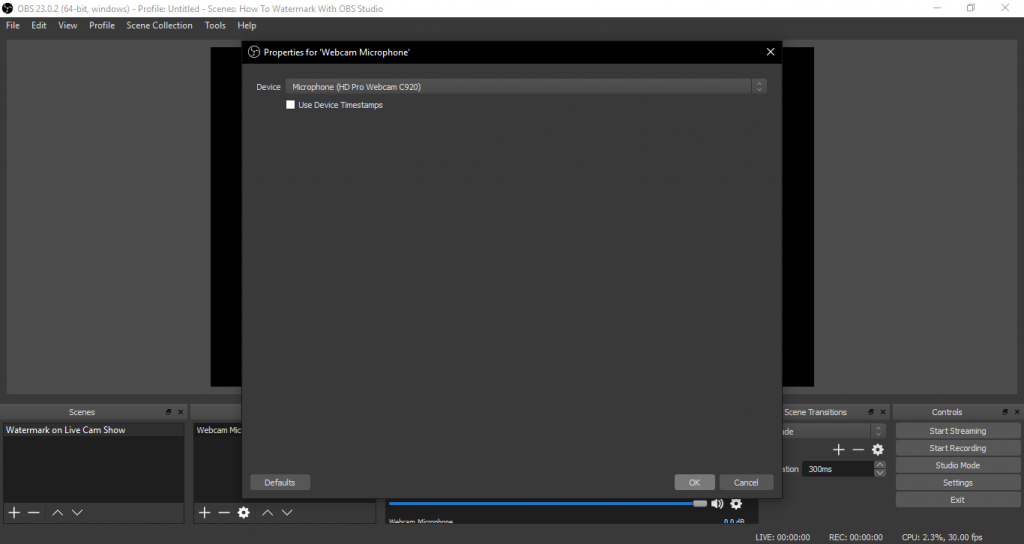
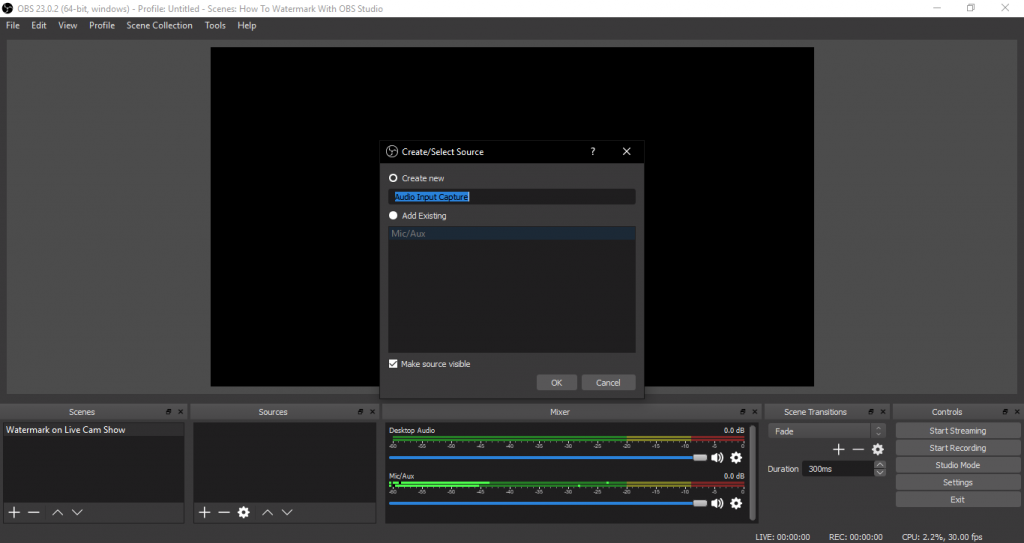
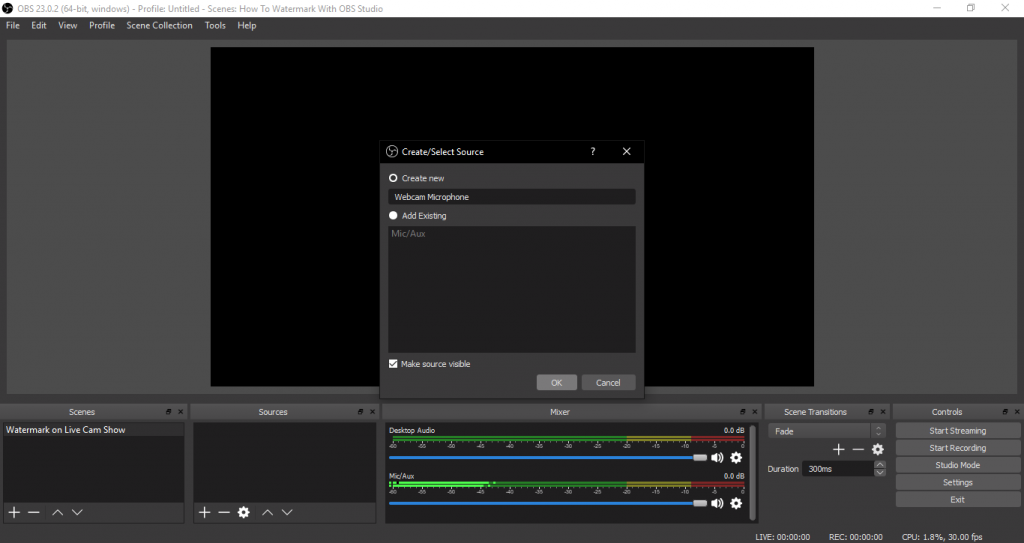
From the bottom “Sources” box, directly to the right of the “Scenes” box, click the “+” sign and select “Audio Input Device.” You are creating a new source, so name it before adding it. I named mine “Webcam Microphone.”
Click “OK” and select your audio device from the drop down menu. Since my webcam was plugged, in that was the audio source I selected to use.
Screen Video Source 1
Screen Video Source 2
Screen Video Source 3
Screen Video Source 4
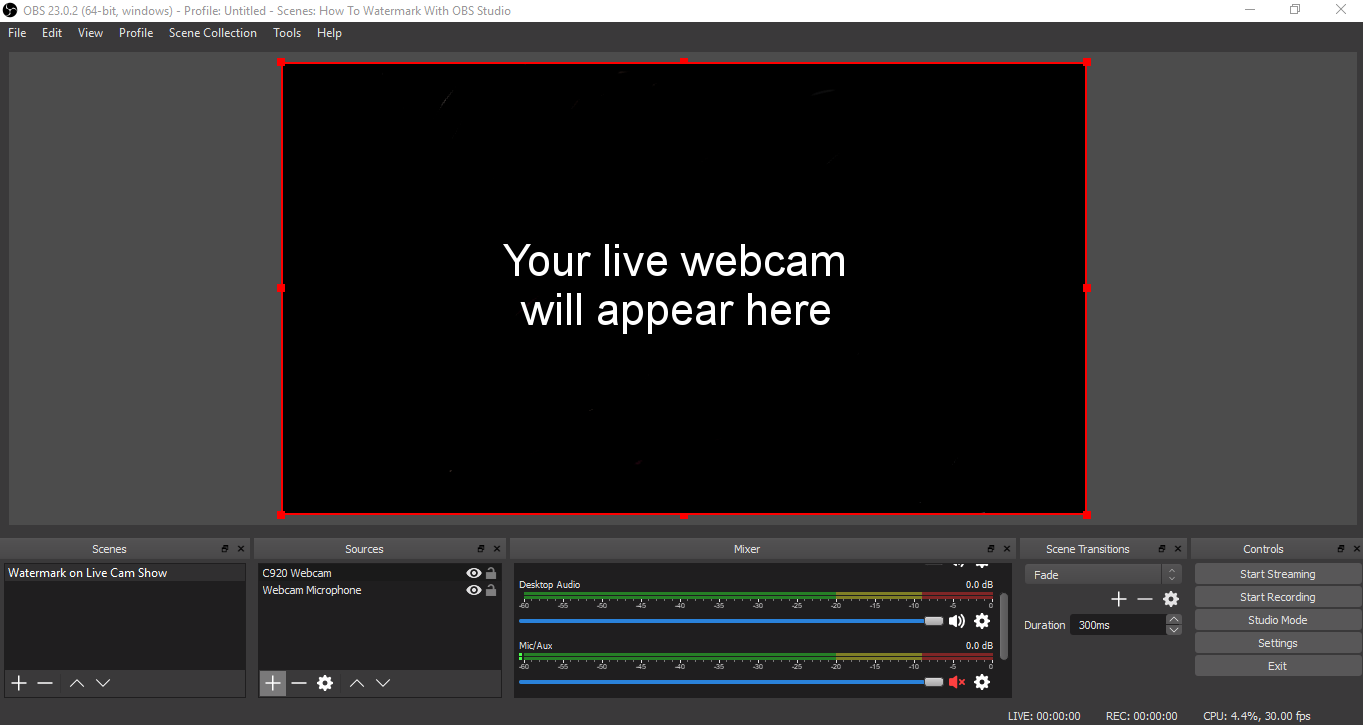
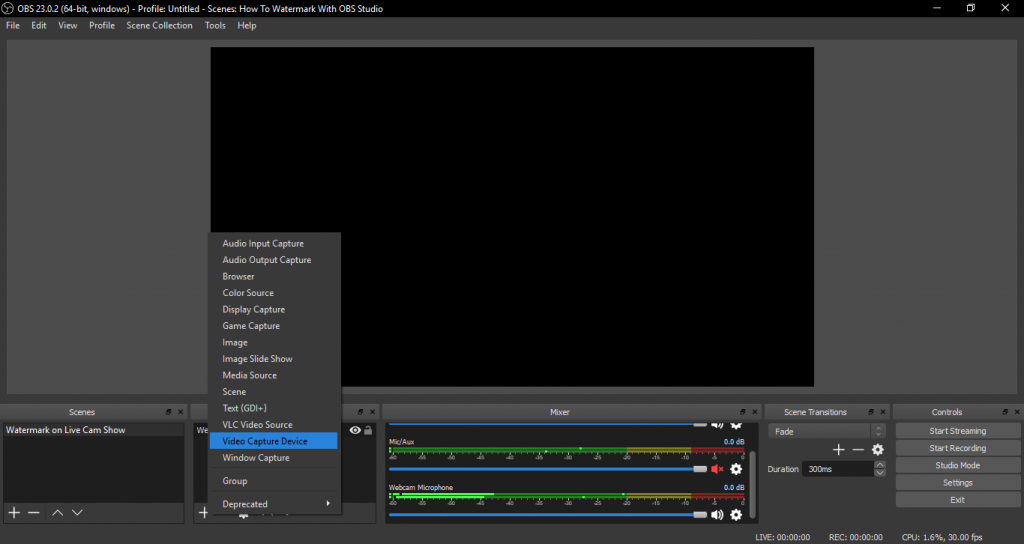
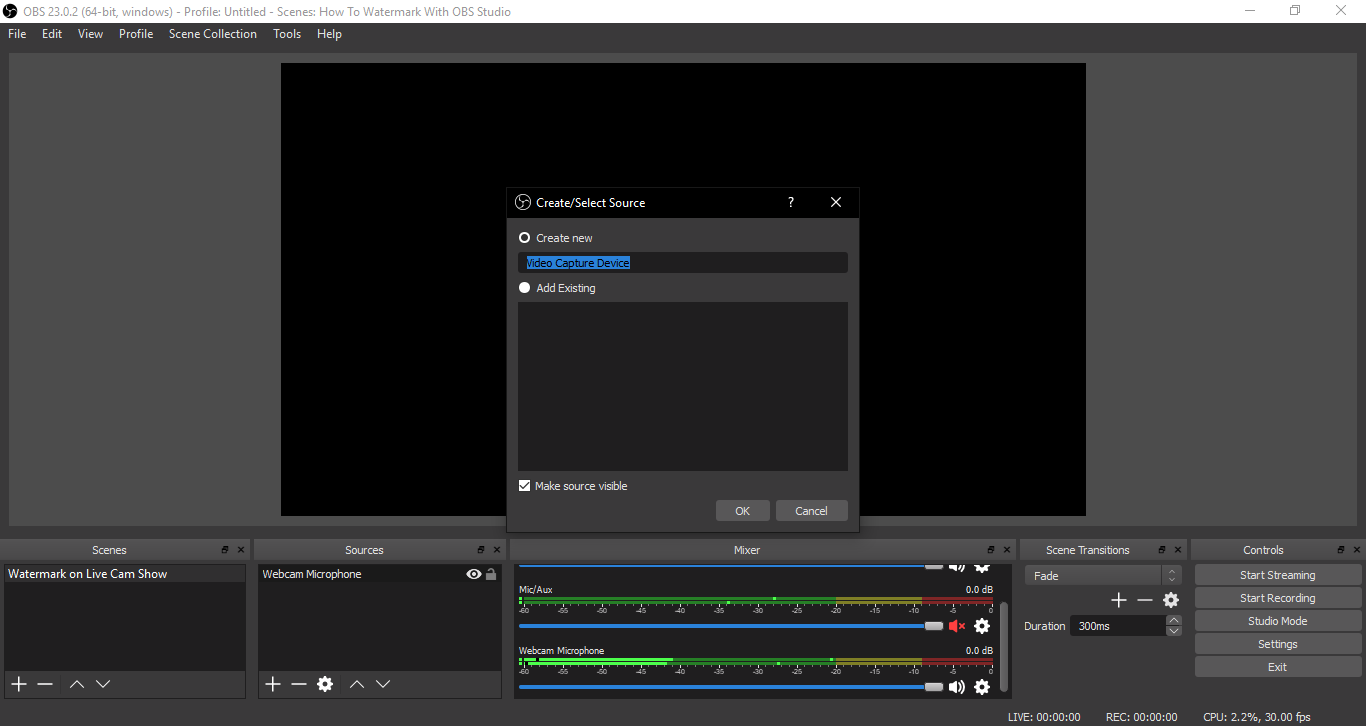
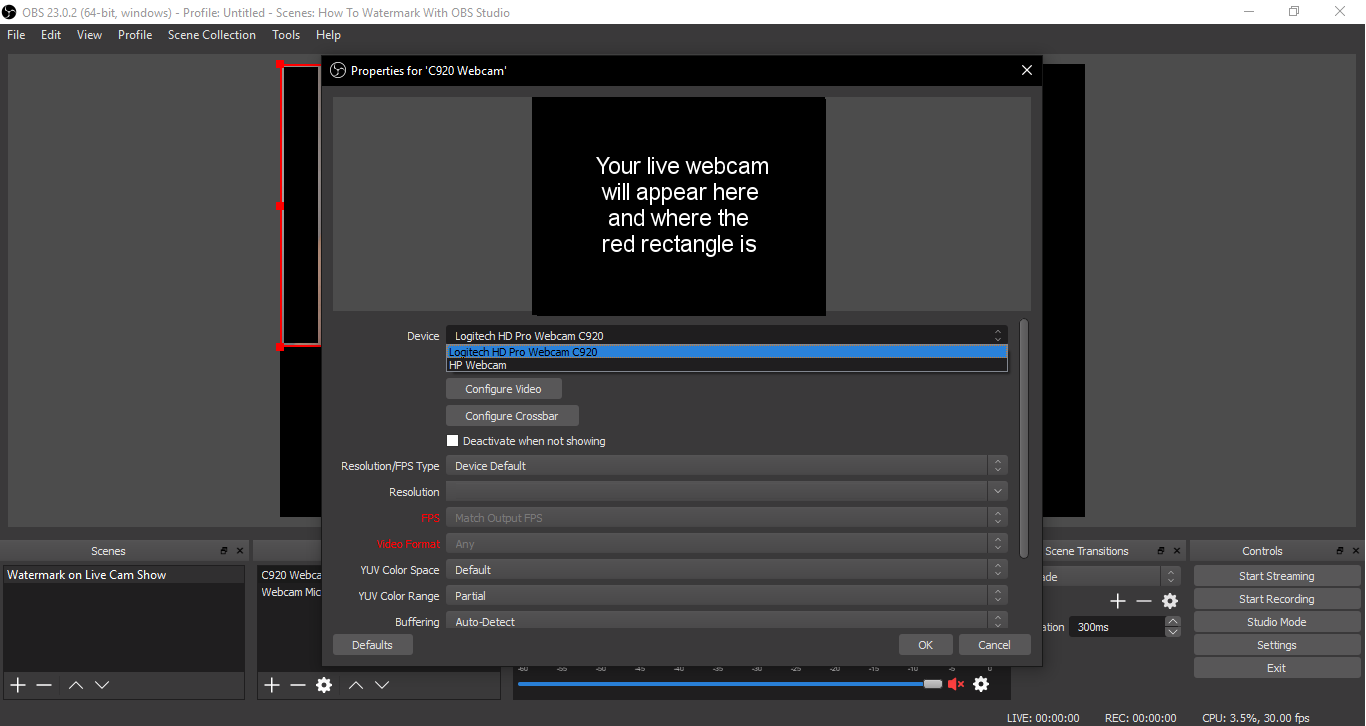
Repeat the same process to add your webcam as a video source. Add a new source, but this time choose “Video Capture Device.” Name the new source first, and then pick from any webcams that are detected. I chose my Logitech C920 and named it “Webcam Main.”
Your live webcam will appear once selected, but you’ll likely need to right click to the picture, select “Transform,” then select “Fit to Screen” to format it.
Step 3: Make Your Mark, Make A Statement
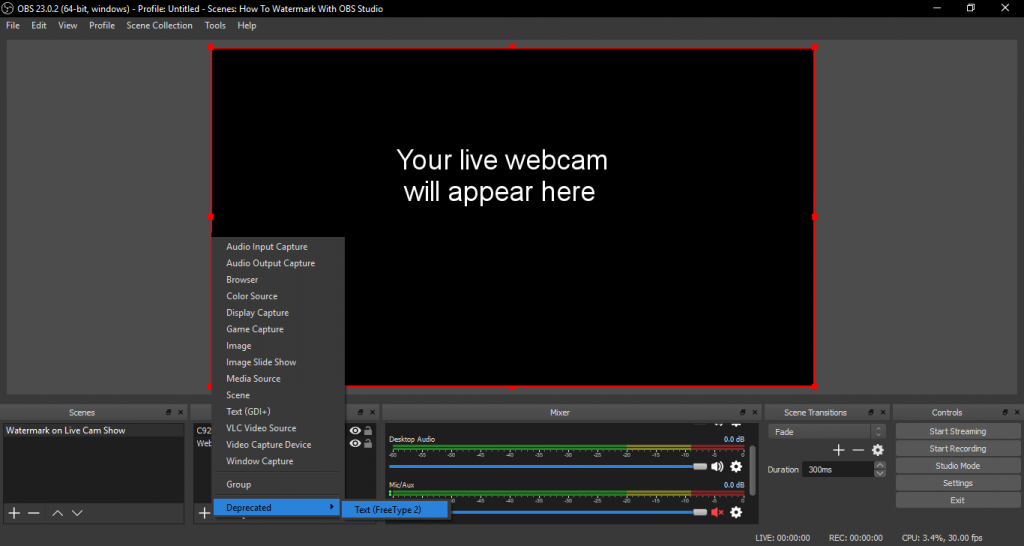
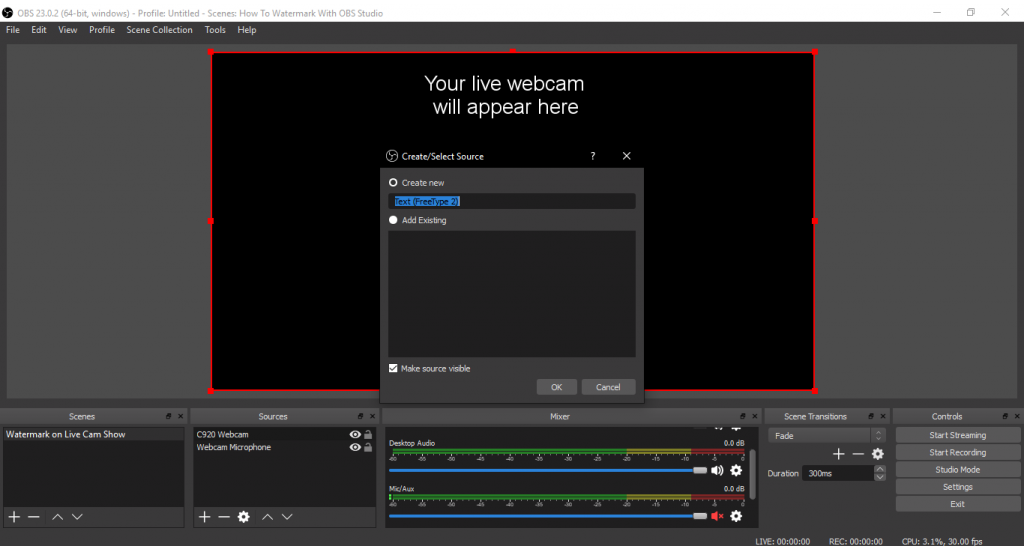
The last step before broadcasting is to add a groovy text watermark. Return to the “Sources” box and add another source via the “+” sign. At the bottom of the menu select “Deprecated —> Text (FreeType 2)” to bring up the text properties box. Name the source something obvious. I called this “Watermark Text.”
Add Text 1
Add Text 2
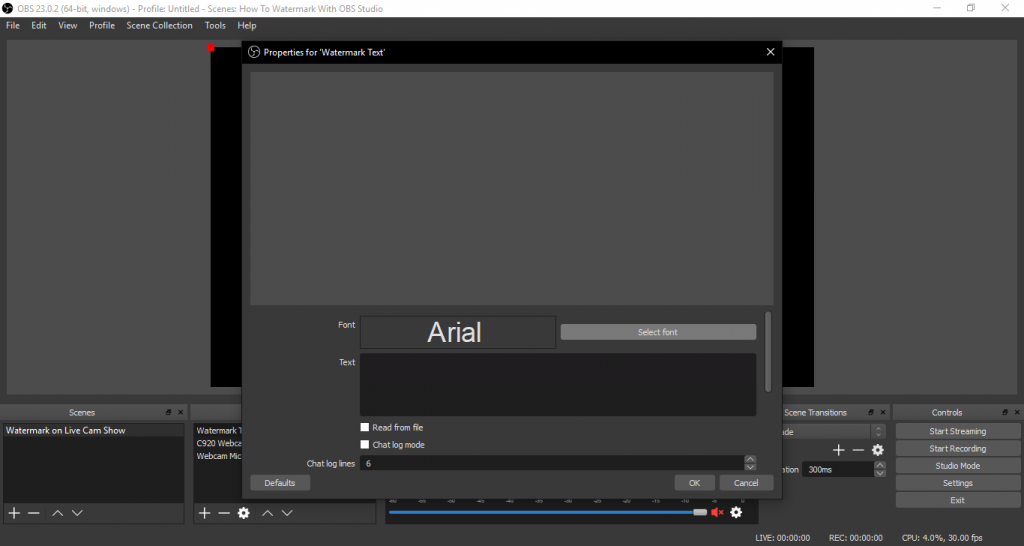
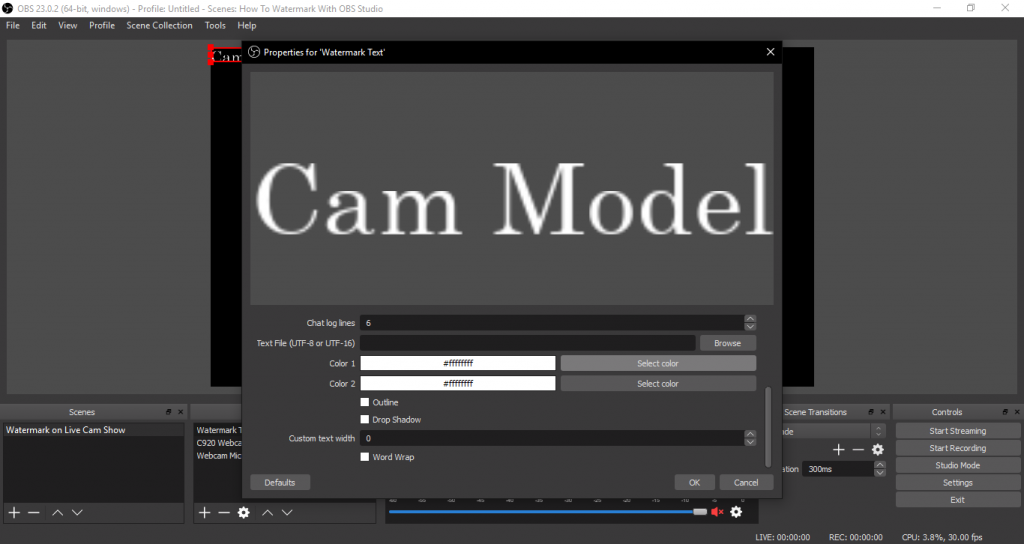
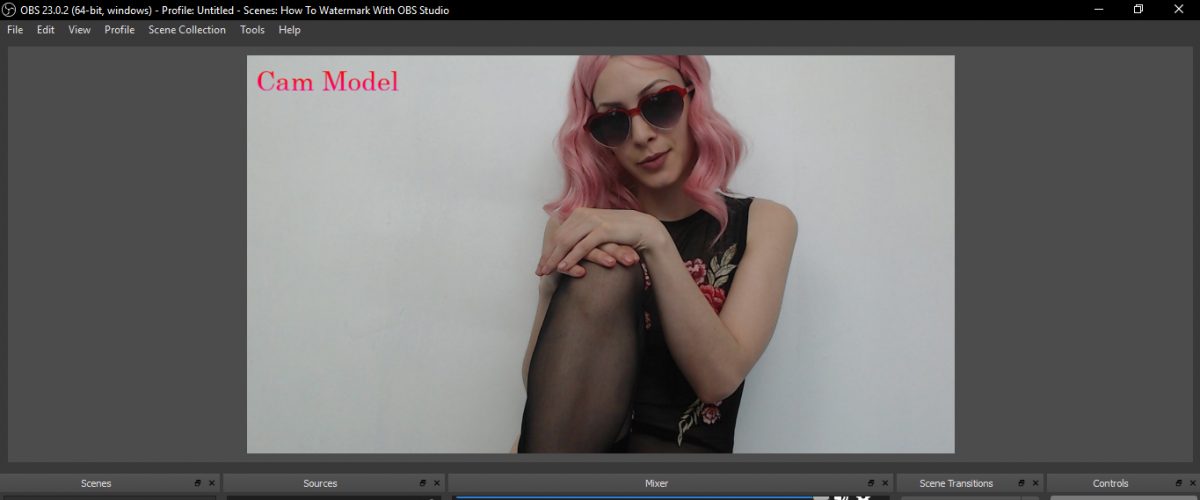
Next to the box that says “Text” is space for you to enter any text. This is where you type your watermark. The example for this article is “Cam Model,” a mock stage name, so I’ve entered it there. Notice that the text appears in the properties box as a preview.
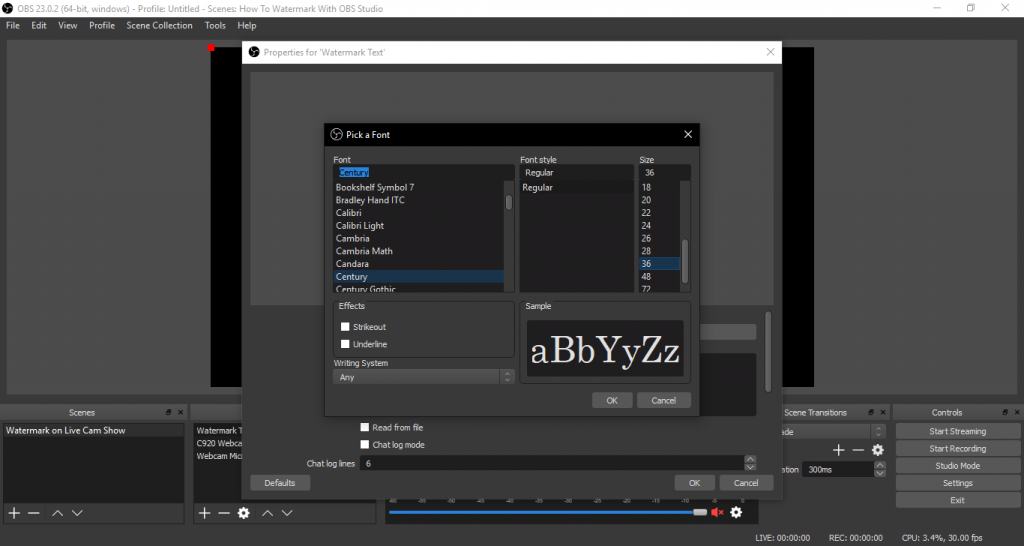
To make changes, click on the “Font” box. It will bring up advanced font properties where you can select the size and style of your text. I chose for Century font at size 36.
Add Text 3
Add Text 4
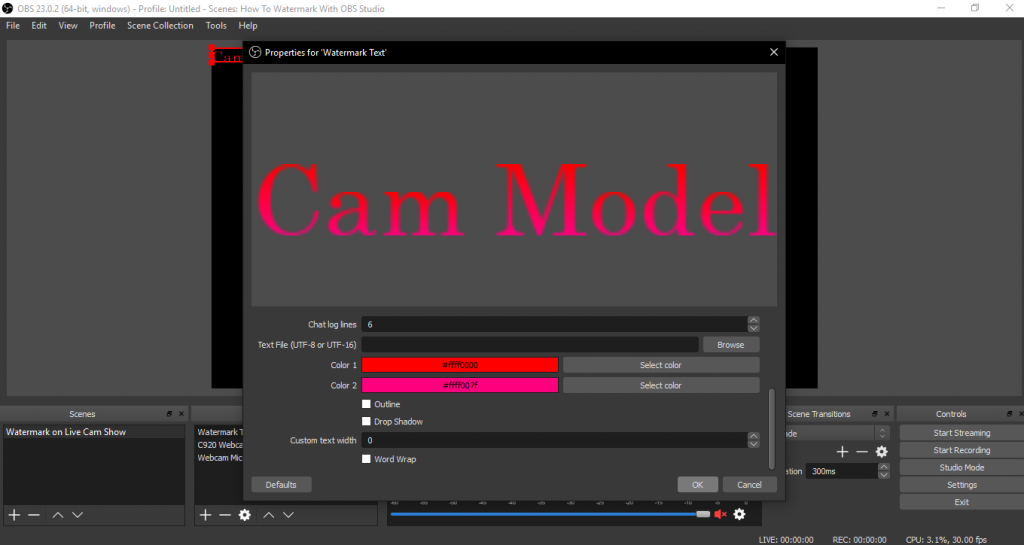
Below that are options to adjust the text colors or create a color gradient like the one shown here. Pick colors that will stand out against the background of your stream without being too bright. Select OK and finish by using your cursor to pick a placement for the watermark text box. Corners are good places to align your watermark. If you ever want to edit your text, right click on your text source in the “Sources” box and select “Properties” to make changes.
Add Text 5
Add Text 6
Do a test before going live for the first time by broadcasting to your password protected cam room. If everything looks and sounds good, you’ll look great live. Remove the password and hit the broadcast button when you’re ready!
Your fans will be surprised at your new abilities, and you may even attract more viewers. If you want to learn more OBS Studios, you’ll be able to experiment with the creative potential of the software.
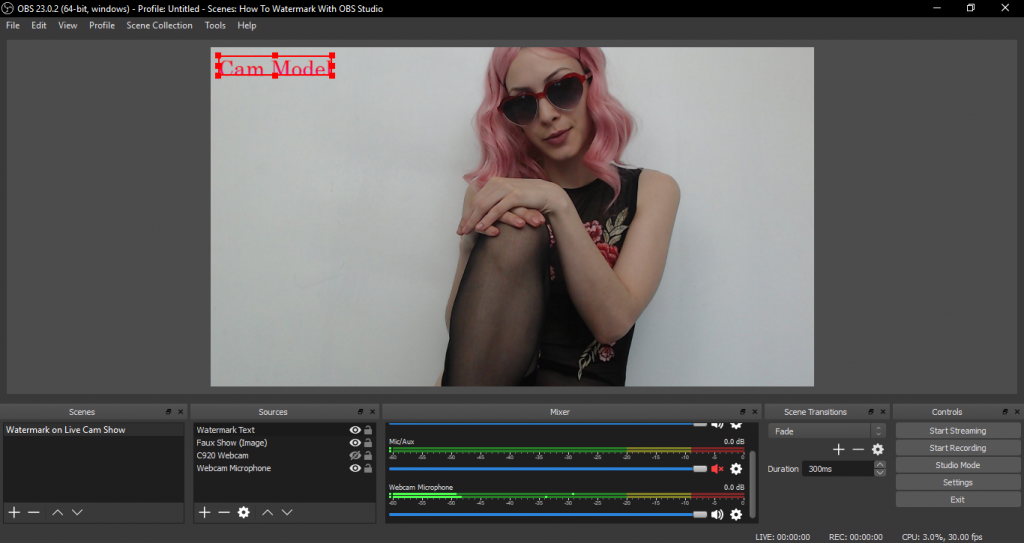
Look at your cool watermark!
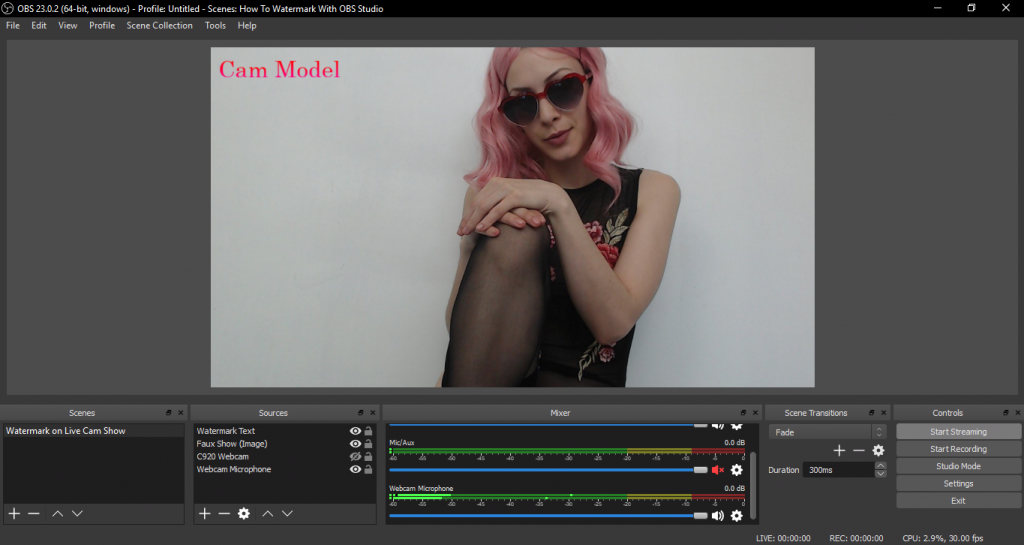
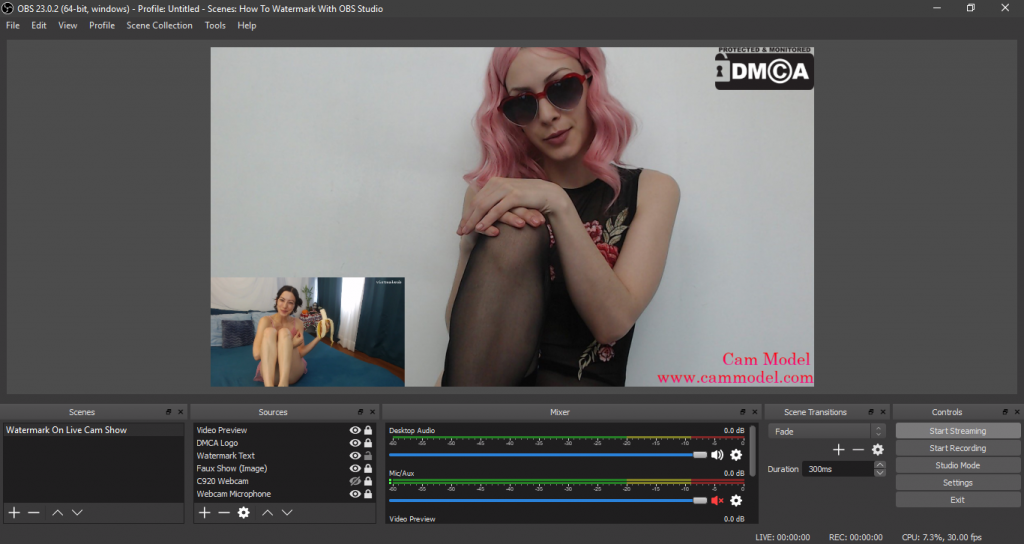
Just to show the versatile nature of OBS Studio, here’s a fun example of the same stream created above, but with a more extensive watermark, a DMCA logo and a looping video preview of a clip that I’m currently selling.
I hope you found this tutorial useful. It takes a bit of sweat equity to learn the process, but there is no way to assign value to the amount of benefit you can get out of learning the process for yourself. Hope this helps, let us know what you think.
—
Anouk Gilmour is a registered yoga teacher at the 200-hour level. Eight years after trying camming in college, she is an amateur adult model again. Find her on Twitter at @anoukgilmour.
Images edited and graphics created with GIMP 2.8. All images/screenshots/edits are captured by or are original creations by Anouk Gilmour.






[…] back to Cam Tech-niques! In Part 1 of the series, we covered basic OBS watermarking. In Part 2, we’ll learn how to make a simple beginner […]
[…] the first two parts, we followed step-by-step tutorials to learn watermarking with OBS Studio and visual profile making with Canva. Now, in the third and final installment of the series, […]
[…] Check out Anouk Gilmour’s tutorial to watermark your shows with OBS right here. […]
[…] Don’t know how to watermark? Check out Anouk Gilmour’s step-by-step guide for watermarking clips and content right here — “Cam Tech-niques: Watermark Your Shows With OBS“ […]